How To: Extensions

Extensions (aka: top outs, cut outs,
extenders, embellishments, etc.)
are elements on a board that extend beyond the normal live area of a structure. They are
used to extend design elements beyond the normal boundaries of the structure. The uncommon
shape and extra size works well to draw even more attention to the billboard ad.

How To: Extensions
Extensions (aka: top outs, cut outs, extenders, embellishments, etc.) are elements on a board that extend beyond the normal live area of a structure. They are used to embellish and extend beyond the normal boundaries of the design. The uncommon shape and extra size works well to draw even more attention to the billboard ad.

In this example we'll
be making the star burst element of this design an extension. The canvas size is
highlighted in orange to the right.
 Step 1.
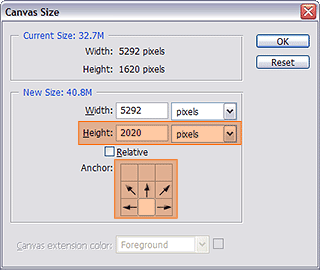
The first thing that needs to be done is to extend the canvas to make room for the
extension. We've added 400 pixels to the height of this document by anchoring the
bottom of the canvas. A good rule of thumb is to add about a 108 pixels for every
linear foot to extend off the board.
* Although every market standards are different, the most common extension limits
are 5 feet off the top, 3 feet off the left and right, and 2 feet off the bottom.
Contact your local Lamar representative to determine that market's standards.
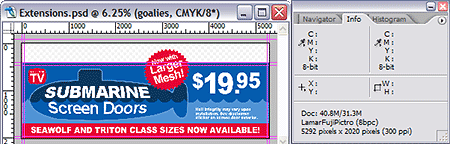 Step 2
. With the extra canvas in place we can enlarge and move the
star burst element up and over the top of the board to create the extension.
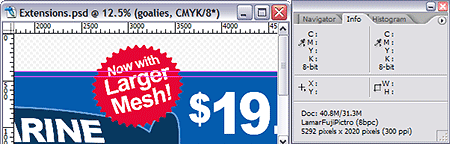 Step 3
.
To determine the size of the extension, Ctrl/Cmd click the thumbnail in the Layers
Palette if the extension is on its own layer. If not, use the Marquee Tool to define
the area around the Extension.
Mouse over the image to the right to see the selection.
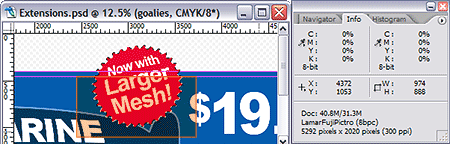 Step 4.
 Now
hold down the Alt/Opt key with the Marquee Tool to subtract the live area of the board
from the selection. The orange highlight indicates the area to remove from the
selection.
Mouse over the image to the right to see the selection.
The area above the orange highlight is the bleed area and should not be subtracted
from the selection. Check in the info palette to determine the size of the snipe
(highlighted in orange on the mouse over image). Divide these pixel dimensions
by 9 to calculate the size of this extension. Ex. (H: 338 x W: 940 ÷
9 = H:37.55" x W: 104.44") This is the actual size of the
extension. Always round up to the near inch when determining size. This extension is
38" x 105".
The previous section describes how to create a snipe as well as how to calculate
it's size. This next section takes Snipes one level further by setting
the file up for the Ultra printing process. The Ultra Hi-res machines are
used to print on the sticky back substrates. These Ultra Hi-res machines
print at 36ppi, exactly 4 times higher resolution
than the standard 9ppi of the original file.
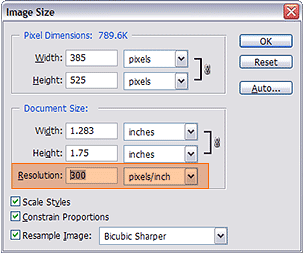 Step 1.
 Complete steps 1 through 6 in the previous section
before beginning this step. Go to the Image>Image Size.
Click on the Resolution field shown to the right.
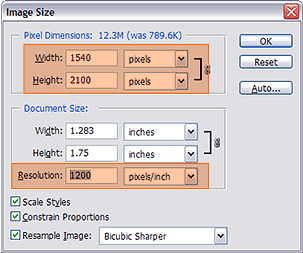 Bonus 2.
 Change the resolution from 300ppi to
1200ppi. Make
sure the Resample Image option is checked and click
OK.
This will make the document exactly 4 times larger. This is done to match
the print resolution of the Ultra Hi-res machines.
 Bonus 3.
 Open Image>Image Size again.
This time
Uncheck Resample Image.
Now change the Resolution from 1200ppi to
36ppi as shown
to the right.
You can see that the pixel dimensions are exactly the same, but the
Document Size is now 42.778" x 58.333". Don't those numbers sound
familiar? This document is now set up at size in the correct resolution
for Ultra Hi-res Printing.
This
Snipe is now ready for submission to Lamar Graphics. Just
save this file as a .PSD, .EPS, .TIF, .JPG, or .PDF .


 Creating and Sizing Extensions in
Photoshop
Creating and Sizing Extensions in
Photoshop
